So after being tied up for most of January, I'm back onto GRIMLITE.
Since their arrival in the game, Horrors have felt pretty central to GRIMLITE's identity. Fighting your friends is fun, but throwing down a terrifying monster between the two of you makes things even more interesting.
But I sort of wanted them to be more horrific. Not just big scary things to be avoided, but even more firmly planted at the core of your warband's story.
So let's look at how Horrors have been shoved into the spotlight for this latest version of the game. I'll get there soon, but it all starts with Glory Tokens.

I'd been thinking a lot about the Glory Tokens that acted as both battlefield objectives and currency to spend between battles. They worked okay, but it felt a bit familiar and safe. Dare I say boring?
GRIMLITE diverges from the norm in so many other areas. Am I missing something more interesting I could be doing with this structure?
I guess it all comes down to victory and rewards.
To quote Sean McCoy from this post talking about introducing a High Score system to Mothership:
Finally, the hardest beast to kill: Your character’s Level. I love levels, I love the sound of a “Level 3 character.” I like the way they make me think of video games and progressing to new levels. But I think there’s a new phrase from video games we can steal to have a great impact on Mothership: The High Score.
So, instead of Level, which is just sort of an abstract measure of power used as a holdover from D&D. Let’s just cut straight to the arcade and call it your “High Score.” And let’s have that score increase by 1 every time you play a session.
This tracks something that, to me, is really interesting. It just very simply tells you how long the character has been played. This is a survival horror game, how long has your character survived? And can you beat that number next time? Got a level 0 character? Oh tonight is your first night. Meeting a level 53 character? Whoa, you’ve seen some shit.
Obviously Mothership isn't even the same type of game as GRIMLITE, but it sums up an attitude I've wanted to explore for a while now.
Maybe some victories are just victories.
Winning at the Olympics gets you a medal, you don't suddenly unlock a new pole-vaulting technique. But you still want that medal, right?
Tying victory to your Warband's growth in power, and failure to its potential decline, sounds like it would generate some good drama. It sometimes does, but in practice I've found it far too unreliable. At times I even found it was outright sucking the drama out of a situation. Glory was so valuable that I found myself playing safe, doing the "play to win" thing rather than the "play to find out what happens" thing, stressing about the rules. Everything I wanted to avoid with GRIMLITE.
So how do I want to treat victories in this game?
Winning should be, to a certain point, its own reward. You're playing to win because you want to beat your friend at the game, and you want your beloved miniatures to succeed.
BUT you want your warband to change over time, and ideally their history of success/failure should dictate this as you move through the campaign.
To summarise the changes:
- At the start of each battle you build your warband using your Renown, starting with 20pts. You pick from:
- A Leader (free, you keep them throughout the campaign but have to pay for their gear and upgrades)
- Some followers and your gear from your Faction list.
- Units that have fought in at least one battle can buy Faction-specific upgrades.
- Yes this means you can effectively build an entirely new warband (except your Leader) for each battle, but let's be realistic, you'll be keeping some favourites on board even if they've been reconfigured.
- When a unit is Taken Out during a battle they still roll afterwards to see if they're truly dead. If they are, then you retire the miniature for at least one battle. Afterward you can bring the mini back, but you'd better do some explaining that this is a new person.
- If your Leader would die then somebody else dies instead, saving them. Not much fun fighting without your Leader.
- Note that death does not affect your Renown, so no matter how many of your units die you've always got your full Renown to spend on the warband.
- After the battle, BOTH Warbands receive extra Renown based on whether or not the Horror was killed, regardless of who did it (see further down this post).
- Yes, both. So if we play 10 battles against each other, then we're both going into the next battle with the same amount of Renown points to spend on our warbands.
- Being the one to kill the horror or achieve the secondary objective gives you two juicy rewards, but these are about horizontal growth, not vertical.
- If you're playing a proper Campaign you get some Prestige. The first one to 10 Prestige gets to initiate the final climactic battle and attempt to win the Campaign outright.
- When you're spending your Renown on your Warbands, you can buy from your Faction list AND the secret unlockable extra items that are made available by killing specific horrors and achieving the objective in specific Scenes. If you're the one that killed the Chameleoid then you can buy fancy stealth cloaks and bio-spike guns, but they'll cost you.
- So players are always going shopping with the same amount of money in their pocket, but some are learning about secret shops hidden in cellars and alleyways.
There's a shift towards a looser style of play in some of those changes, but I figure I need to start walking the walk with regards to Kitbash Attitude. I want to embrace the stuff that I love about this sort of game, and break the obstacles that get in the way. This is not a tournament game.
I want you to be afraid of the Horrors, but I don't want you to be afraid of permanently stalling your warband by having a few bad defeats and bad luck on the Casualty rolls.
Remember, this is all about the Horrors. All these changes above sound nice and generous, but really they're just allowing me to make Horrors that are actually horrifying.

So now we've got all that reward stuff of that out of the way, and we're all going into the game with a fresh attitude of "play to find out what happens". Well, that means now we can really unleash the Horrors and makes them truly nasty.
Previously, Horrors sat separate to the two scenario halves, and felt like a sort of icing on the cake. The Mission gave you the main objective you were focusing on, and the Scene gave you a smaller secondary objective and a random event at the end of each turn.
Some involved killing Horrors to gain Glory, but often the Horrors were just there to threaten you and get in the way. Again, this worked just fine, but I want them to feel more impactful, like the Horror might be the most important thing about the scenario you're playing.
In the new version, Scenarios are still split in two, but this time into the Horror and the Scene.
The Horror half gives you a (usually) singular Horror that you're trying to defeat, like a beefed up version of the Greater Horrors from past versions.
They might also have some Minions that are closer to the old Lesser Horrors.
But most importantly, three Nexuses are deployed. These could be nests, graves, abyssal breaches, but they're something that's keeping the Horror alive and corrupting their environment.
Horrors cannot be killed until all three Nexuses are destroyed. So we're going hard into that boss-fight feeling.
Oh, and rather than the Scene giving you random events, you now roll a random event for the Horror at the end of the Round, giving them one last sting in the tail.
It gives a lot more design space to make a monster feel unique. So far there are 6 and they all do their own thing.
The Devourer is the simplest, being the introductory Horror. Its gluttonous hoarding has attracted a swarm of vermin to the area, and destroying these stashes only makes the Devourer more furious.
The Warped Hunters are a trinity of unique alien jerks that act as each other's Nexuses, so you can only kill any of them once you've wounded all of them. They're so arrogant that sometimes just wounding one of them will leave the rest of them shaken, or could motivate them to raise their game.
The Abyssal Colossus doesn't start on the board, but emerges from the first of the Abyssal Breaches that you destroy. Unfortunately there's no way to close these breaches without being blasted with its unnatural energy, so choose somebody tough or expendible.
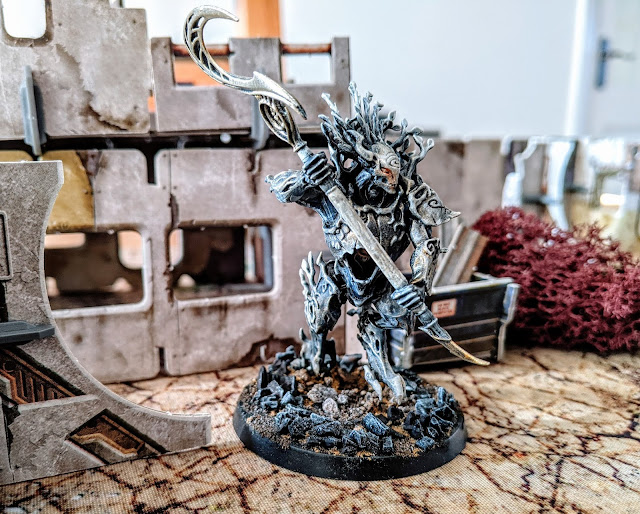
The Winter Harvester (pictured above) revels in death, and the death of any unit makes this Horror and their Pale Knights stronger for the rest of the Round. The Knights guard their graves, and giving them a proper death is the only way to seal their souls away and eventually take on the Harvester. This one is probably busted, too difficult, but it's good to have something to aim for.
The Chameleoid spends half of the battle off the board, with the Nexuses representing illusory shadows that could be acting as their hiding place. You never know for sure when they're going to appear or vanish back into the shadows.
Twin Leapers are a pair of sting-tailed nightmares that are dangerous just to be next to, even when Exhausted. Worse still, whenever one of them acts, the other springs into action, and destroying their nests only releases their Twisted Spawn. When this whole family are on the board together things can quickly get overwhelming.
Be sure to let me know if you try out this new version. As always, expect the living document to keep changing as I work on this, so make sure you're on the most recent version.
Good luck...


